Homeowners in Pembroke Pines often look under the sink, see that unused drain opening, and think a garbage disposal would make life easier. Less scraping into the trash, fewer odors, and a cleaner sink routine sounds good. The real question is whether a homeowner can install it without calling a pro. The short answer is yes, sometimes. The honest answer is that it depends on the sink, the plumbing layout, and comfort with electrical connections. A garbage disposal installation can be straightforward in a newer kitchen built with a dedicated outlet and a compatible sink flange. It can also turn into a full afternoon with surprises like corroded pipes, a shallow P-trap, or a shared dishwasher drain that needs a proper air gap or high loop.
Tip Top Plumbing & Restoration installs disposals across Pembroke Pines, from Silver Lakes and Towngate to Chapel Trail, Pembroke Falls, and beyond. The team sees what goes right with DIY work and what causes callbacks. The notes below break down the decision with clarity so a homeowner can choose the best path for the house, budget, and timeline.
What makes a DIY disposal realistic
A homeowner who enjoys small projects and can safely handle basic electrical tasks stands a good chance if the setup checks a few boxes. The sink should have a standard drain opening at 3.5 inches. The cabinet should house a grounded outlet on a 15 or 20 amp circuit within reach of the disposal’s cord. The plumbing stack should already include a P-trap assembly with enough vertical drop to tie in the disposal’s discharge elbow. If there is a dishwasher, there should be an air gap on the counter or a proper high loop under the counter. With those pieces in place, a standard unit with a pre-wired cord can go in with common hand tools.
The odds improve further in homes built or remodeled in the last 15 to 20 years. Builders often planned for garbage disposals, especially in Pembroke Pines neighborhoods where HOA standards favored consistent kitchen layouts. If the sink is an undermount composite or stainless steel model with a sturdy deck, mounting is usually smooth. Older cast iron sinks can support a disposal, but the mounting ring sometimes fights back and may require extra muscle or a different flange kit.
Where DIY usually runs into trouble
Two patterns recur. The first is an electrical snag. Many homes have the dishwasher hardwired and no outlet in the sink base. Trying to share power without a proper circuit and switch can violate code and create a shock hazard. The second is drain geometry. A disposal lowers the outlet height compared to a regular basket strainer by an inch garbage disposals or two. If the wall drain is already low or the P-trap sits high, the result can be a trap that back-pitches or a connection that never seals. That leads to slow drainage and leaks.
Add a few local variables. In Pembroke Pines, slab homes often have fixed-height wall drains that leave little room to rework the trap. If the countertop already has an air gap for the dishwasher, good. If not, a high loop may pass inspection in some cases, but an air gap is still the reliable standard to prevent backflow. Finally, corrosion on the existing tiptop-plumbing.com garbage disposals metal trap or tailpiece can crumble during disassembly. What starts as a quick swap turns into a parts run for a new trap kit and tailpiece.
The core steps, simplified
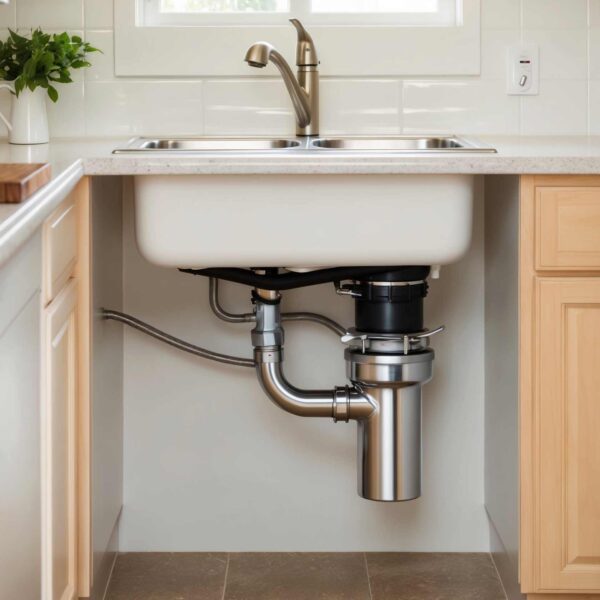
If a homeowner decides to proceed, the project breaks into a clear sequence. Shut off power at the breaker, unplug or de-energize the outlet, and confirm with a tester. Remove the old drain assembly from the sink. Install the new disposal flange with plumber’s putty, set the mounting ring, and tighten evenly. Wire or plug in the unit per the manufacturer’s instructions. Knock out the dishwasher inlet plug if the dishwasher will drain through the disposal. Attach the discharge elbow, set the P-trap to the correct height, and tighten all nuts by hand, then a quarter turn with pliers. Finally, run water, check for leaks, and test the motor.
Every brand has small differences. Some units mount with a twist-lock while others use a three-bolt assembly. Horsepower ratings range from 1/3 to 1 horsepower. As a rule of thumb, 1/2 horsepower works for a condo or small household, 3/4 horsepower for most families, and 1 horsepower for cooks who feed guests often or grind fibrous scraps like celery with regularity. Noise ratings, stainless steel grinding components, and anti-jam features are not gimmicks. They translate into a quieter kitchen and fewer service calls.
How a pro looks at the install
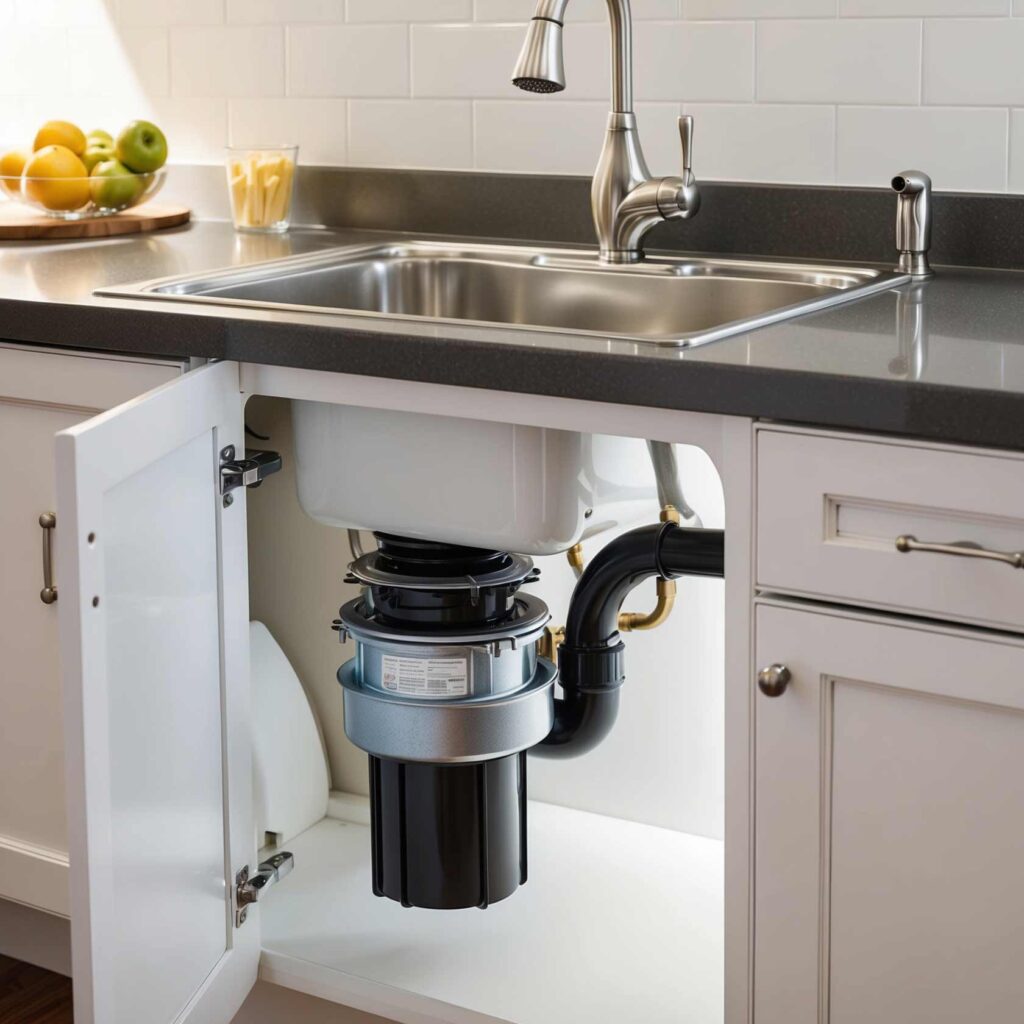
A plumber does much more than bolt the can under the sink. Before touching anything, the tech confirms the outlet is grounded and on a proper circuit. He checks the trap arm height to make sure the disposal outlet will sit above the trap weir. He looks for signs of prior leaks on the cabinet base and around the sink flange. He measures clearance for the unit so the door closes cleanly and the cord does not bind against a sharp edge.
A small example from a job in Pembroke Lakes shows the value of the walkthrough. The homeowner bought a 1 horsepower unit for a double-bowl sink with a tight corner cabinet. On a quick check, it became clear the unit would hit the center stack and the cabinet door. Swapping to a compact 3/4 horsepower model solved both problems without compromising performance. The install finished in about 90 minutes. The larger unit would have required moving the trap and trimming the shelf, which adds time and cost.
Common mistakes that cause leaks or clogs
Most bad outcomes trace to three decisions. The first is skipping plumber’s putty or using silicone that cures too fast. The sink flange needs an even bead of putty to seat flush and seal. Without it, water wicks under the flange and stains the cabinet base over time. The second is misaligning the trap and forcing it to meet the disposal discharge with tension. Plastic trap parts should align naturally. If they torque into position, they tend to loosen with vibration. The third is forgetting the dishwasher knockout plug. The dishwasher drains into a solid wall inside the disposal and backs up into the dishwasher on the first run. Removing that plug with a firm tap and retrieving the plastic disc from inside the grinding chamber solves it.
There is also the issue of improper materials. Flexible accordion-style drain hoses attract buildup and slow flow. They also trap food odor. Solid PVC or ABS with smooth interior walls stays cleaner and meets code. Using Teflon tape on slip-joint threads is another common mistake. Those threads are not designed to seal with tape. The beveled washer inside the nut does the sealing; the nut needs a clean, square seat to work.
What belongs in a disposal, and what does not
A disposal grinds small food scraps. It is not meant for fibrous, starchy, or greasy loads. Coffee grounds, eggshells, and onion skins tend to build up in the trap. Potato peels and rice expand and turn into paste. Fats and oils coat the walls and catch other particles. Citrus peels are fine in small amounts and help with odor, but they should be thin and fed slowly with cold water running.
Water use matters. Run a strong flow before starting the unit, continue during grinding, and keep it on for 10 to 15 seconds after the noise settles. That carries particles through the trap and into the larger drain line. Cold water helps keep grease solid and easier to push along. A pro in Pembroke Pines will also remind clients that South Florida plumbing often shares vent stacks between units in townhome communities. Heavy grease from one kitchen can affect neighbors downstream. Good habits help everyone.
Electrical safety in plain terms
If the cabinet already has a grounded receptacle controlled by a wall switch, the work is easier. Some disposals come with a pre-wired cord that plugs in. If not, installing a cord kit is simple but must be done with care. The black wire connects to hot, white to neutral, and green to ground per the wiring diagram inside the unit’s cover plate. All connections belong under wirenuts with a proper strain relief at the housing.
If there is no outlet, a licensed electrician or a plumber qualified for electrical work should install one. Tapping into a dishwasher circuit without confirming load and code can create a hazard. GFCI protection may be required based on the layout and outlet location. The team at Tip Top Plumbing & Restoration coordinates with electricians when a new circuit is the safe path. It avoids callbacks, inspections that fail, and tripped breakers during dinner prep.
Cost ranges and realistic timeframes
A homeowner with all the parts and a clear setup usually spends two to four hours on the project. That assumes no wiring changes, a compatible trap height, and a standard single-bowl sink. Time stretches with double-bowl sinks, dishwashers that need rework, or tight cabinets. Most DIY installs land between one afternoon and a Saturday morning plus a trip to the hardware store.
Expect to invest in the unit itself at $120 to $350 for a quality 1/2 to 3/4 horsepower model, more for 1 horsepower units with premium grind. Add $15 to $40 for plumber’s putty, a new trap kit, and a cord kit if needed. Professional garbage disposal installation in Pembroke Pines typically ranges from $195 to $450 for straightforward swaps, with more involved electrical or drain adjustments priced accordingly after a site check. A quick phone photo of the under-sink area helps estimate with accuracy.
Signs a pro should handle it
Some homes benefit from a professional from the start. If the sink is an apron-front or a heavy cast iron model with a thin flange, the mounting ring can deform the opening if over-tightened. If the wall drain is low or the cabinet floor shows water damage, it is smart to correct those issues as part of the install. If a dishwasher share or an air gap adds complexity, a plumber can set it up to avoid backups and meet Broward County code.
Noise and vibration also matter in condos and townhomes near Pembroke Gardens or Century Village. A pro selects a unit with better sound insulation and rubber isolation mounts that reduce vibration through the cabinet. That keeps the neighbors happy and keeps the owner from hearing the disposal in the bedroom down the hall.
A quick homeowner checklist for DIY or not
- Is there a grounded, switched outlet under the sink within cord reach? Does the P-trap align with the disposal outlet without forcing angles? Will the cabinet door clear the unit with room for service? Is there an air gap or proper high loop for the dishwasher drain? Are you comfortable making safe electrical connections with the power off?
If the answers are yes, DIY might serve well. If even one answer is unsure, a call to Tip Top Plumbing & Restoration can prevent a long afternoon and a wet cabinet base.
Installation details that separate a good job from a great one
Small steps pay off. Back butter the sink flange with an even ring of putty and tighten the three-bolt ring in a star pattern a little at a time. Wipe away the squeeze-out cleanly to avoid a gritty ring around the drain later. Support the disposal from below during mounting so it does not twist the flange. Before connecting the trap, fill the sink and let water push through while watching for weeping around the flange and discharge elbow. A quarter turn on a slip nut is more effective than overtightening, which can distort washers.
Use a level to confirm the trap arm has a slight downward pitch to the wall. If the old trap looks stained or brittle, replace it. Mark and drill a clean hole for the power cord’s strain relief and leave a gentle service loop so the cord does not tug on the terminals. If the dishwasher connects, punch out the knockout cleanly and fish the plug out of the chamber so it does not rattle.
Maintenance tips that extend the unit’s life
A disposal lasts longer with short, steady runs rather than long, heavy loads. Run cold water as a rule. Once a week, run a handful of ice cubes with a splash of dish soap for 10 seconds to knock film off the grinding chamber. Avoid chemical drain cleaners. They can damage seals and do not fix mechanical clogs. If the unit hums but does not spin, turn it off, use the Allen wrench in the bottom hub to free the flywheel, and press the red reset button. If it trips again, something may be lodged inside or the motor may be failing.
Odor control comes from cleanliness and flow. Lemon slices smell nice but do not fix buildup. If odors persist, the P-trap may have collected sludge. Removing and cleaning the trap takes a few minutes and usually solves it. If odor returns quickly, the trap slope or venting may be off, which a plumber can address.
Local insight for Pembroke Pines kitchens
South Florida water is mineral-light but warm. Warm inlet water can soften fats faster and carry them down the line as a film. Cold water during grinding helps. Many Pembroke Pines homes also have tight kitchen footprints with corner sinks and 36-inch bases. Compact disposals with a side-mounted discharge often fit better and reduce trap gymnastics. For homes near golf course communities with granite or quartz tops, confirm the hole spacing for air gaps and switches before drilling. A misplaced hole on a finished top is hard to forgive.
Hurricane season brings power blips. A quality disposal recovers fine after outages, but GFCI outlets sometimes trip. If the unit does not start after a storm, check the GFCI, then the breaker, then the red reset on the bottom of the unit. Keep the Allen wrench in the sink base where it is easy to find.
When it is worth upgrading the plumbing
If installing a disposal exposes a shaky trap, consider upgrading the under-sink kit. A new schedule 40 trap and a clean trap arm connection to the wall resist vibration and last longer than thin-wall kits. If the wall drain sits too high, a plumber can open the wall and reset the sanitary tee to the proper height. That upgrade protects against chronic backups. If the dishwasher drain previously tied into a barb on the old tailpiece, switching to the disposal inlet gives a stronger, more sanitary path.
Homes with septic systems require a separate conversation. Disposals feed more solids into the tank. Some households manage fine with careful use. Others prefer to skip a disposal or choose a unit with septic-assist features. For city sewer in Pembroke Pines, routine care and proper use keep the line clear.
Straight talk on warranty and risk
Manufacturers honor warranties when units are installed per instructions, with proper electrical protection and venting. A leak from a bad flange seal or a drain that backs up from poor slope usually falls outside of warranty. That is where professional installation pays back. A licensed contractor warrants labor and returns to correct issues. For a homeowner who values a clean cabinet base and wants to avoid emergency calls during holidays, professional garbage disposal installation is a solid investment.
Ready to install or upgrade a disposal in Pembroke Pines?
Some readers will tackle a Saturday install and do fine, and that is a win. For everyone who wants a clean, code-compliant setup with zero guesswork, Tip Top Plumbing & Restoration handles the whole process. The team helps select the right size for the kitchen, sets the mounting ring without leaks, aligns the trap for smooth flow, and confirms the electrical is safe and up to code. Service covers neighborhoods across Pembroke Pines, including SilverLakes, Pembroke Falls, Chapel Trail, Cobblestone, and beyond. Same-week scheduling is common, and most installs wrap in about an hour.
Call Tip Top Plumbing & Restoration to price a new unit, replace a noisy grinder, or solve a tricky under-sink layout. Send a quick photo of the cabinet space for an accurate quote. The sink will run quieter, drain faster, and stay cleaner, and the kitchen routine will feel easier from the first rinse.
Tip Top Plumbing & Restoration provides full plumbing service in Pembroke Pines, FL. Our local plumbers handle emergency calls, leak detection, clogged drains, and water heater repair. We also perform drain cleaning, pipe repair, sewer line service, and piping installation. From kitchen plumbing upgrades to urgent water line issues, our team delivers fast and dependable results. Homeowners and businesses across Pembroke Pines trust Tip Top Plumbing & Restoration for clear communication, fair pricing, and reliable workmanship.
Tip Top Plumbing & Restoration
1129 SW 123rd Ave
Pembroke Pines,
FL
33025,
USA
Phone: (954) 289-3110
Website: https://tiptop-plumbing.com/, Google Site
Social Media: Instagram, Facebook, Yelp, LinkedIn, X
Google Map: View on Google Maps